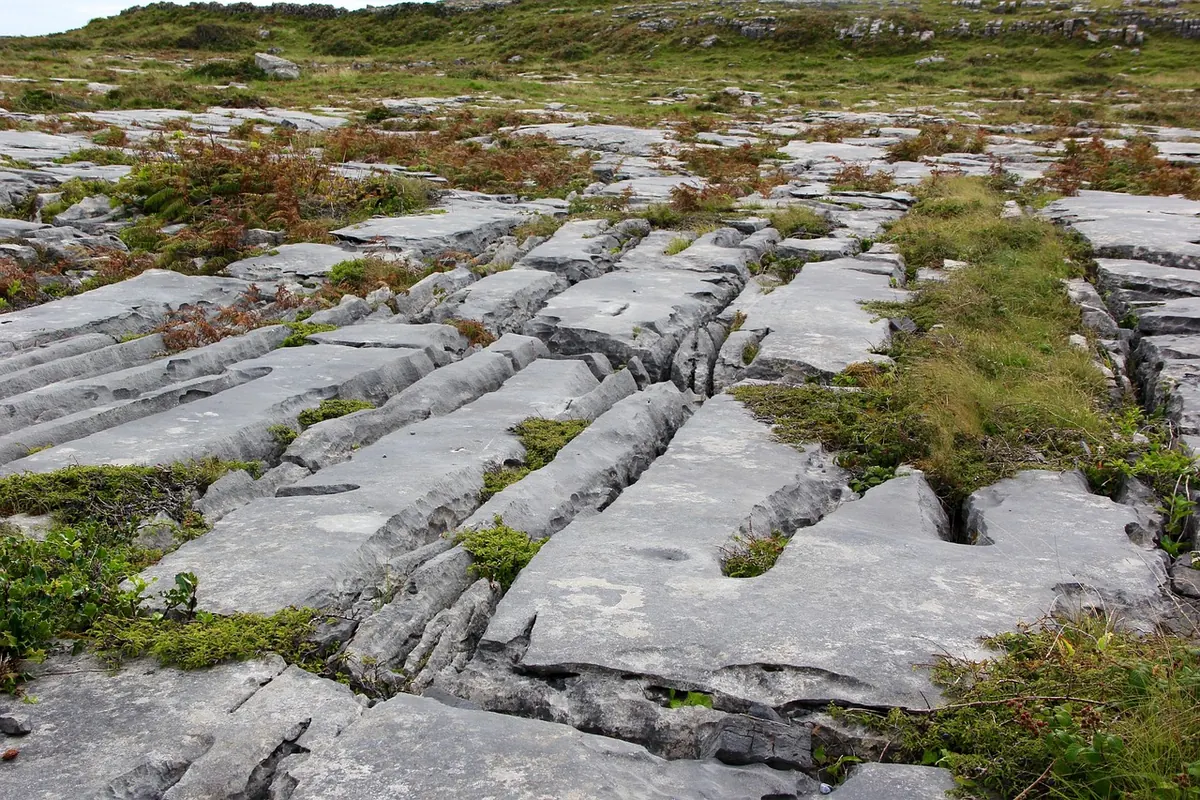
A limestone pavement can look man-made. Flat, pale grey blocks, divided into rough rectangles and rhomboids by dark cracks, spread across a hillside like a floor laid by a mason who lost interest halfway through. Nothing here was cut. Ice stripped away the soil, rainwater widened the joints, and what you are walking on is the bare surface of a tropical sea floor roughly 330 million years old.
Pavements are among the most distinctive landforms in Britain and Ireland, and they are also one of the easiest to identify with confidence once you know which two features to look for, and which lookalikes to dismiss.
Everything else follows from these.
Clints are the blocks — the raised, flat-topped slabs of limestone you actually stand on. Grykes are the fissures between them: the dark, often surprisingly deep slots that separate one clint from the next.
Grykes are not random. They follow the rock's joints, the natural fracture lines that run through the limestone in sets. Where two sets meet at roughly right angles you get rectangular clints. Add a third set and the pattern becomes rhomboidal, with blocks meeting at odd, striking angles. This is why a pavement viewed from above looks like a badly assembled chessboard.
Grykes are usually widest at the top, where rainwater has had the most chance to dissolve the rock, and narrow with depth. Some are only a few centimetres across; others are wide enough to swallow a boot, and a metre or more deep. On some pavements the grykes connect downwards into cave passages, which is worth remembering before you post anything through the gap.
Look closely at the clint surfaces and you will often find smaller solution features: shallow runnels or flutes running down the slope where rain has trickled, and rounded hollows that hold water after a shower.
Three conditions do the work.
First, the rock. Carboniferous limestone is thick, hard, well jointed and laid down in broad, near-horizontal beds. Tilted or heavily broken limestone does not produce good pavement, because the surface does not stay intact long enough.
Second, exposure. The limestone has to be sitting at or very near the surface with its soil and drift cover removed. In many British and Irish examples, glacial ice did the stripping, scouring the bedrock clean and leaving it bare.
Third, rain. Rainwater picks up carbon dioxide as it falls and becomes a weak carbonic acid. Over thousands of years it seeps into the joints and dissolves the limestone along them, widening hairline cracks into grykes. This is slow, patient chemistry, and it is the same process that carves cave systems underground.
Pavement country is limestone country, and in Britain that means the uplands. Reliable places to start:
A word of caution on the last point: limestone comes in many ages, and not every bare limestone surface is a pavement. What matters is the jointed, blocky, in-situ pattern, not the label on the geological map.
If you are unsure whether you have found a genuine pavement, work through this checklist:
That last clue is the quickest one. On an aerial photograph or from a hillside opposite, the dark green grid is usually what gives a pavement away before you can see a single block.
Man-made flagstone surfaces are the obvious confusion, but they are easy to rule out: the joints are too regular and too wide, the slabs are uniform in thickness, and there is usually a path, wall or building nearby to give the game away.
More often, beginners mistake a limestone scar for a pavement. A scar is a steep, terraced cliff face where the beds step upwards — dramatic, but vertical rather than horizontal. Pavement is the flat or gently sloping surface on top. The two often occur together, which is exactly why people mix them up.
Grykes are cool, humid and shaded, and they behave like a chain of tiny nature reserves. Hart's tongue fern, wall rue, wood sorrel and dog's mercury all turn up in them, along with mosses, liverworts and a range of invertebrates that need damp shelter.
This matters practically. Limestone pavement is a threatened habitat, and many pavements sit inside protected sites. Moving stones, filling grykes, or taking plants or rock specimens causes damage that will not repair itself in your lifetime. Look, photograph, and leave it exactly as you found it.
Wear boots with decent ankle support. Grykes are the single most common cause of twisted ankles on limestone, because they are often hidden by grass and heather until your foot is already in one. Keep your hands out of your pockets on uneven ground, and take extra care when the rock is wet — polished limestone is genuinely slippery.
Do not step across a wide gryke with a heavy pack on. Test the clint first, and remember that a block that looks solid may be undermined from below.
In summer, adders bask on warm limestone, so watch where you put your hands and feet, and keep dogs close. Give wildlife, and other walkers, plenty of room.
Take an OS map and note the name of the feature you are standing on — many are labelled. Photograph the surface with a boot or a coin in frame for scale, and jot down which way the joints run. After two or three visits, you will start recognising the pattern from the car park.
Finally, take a moment to think about the timescale. The blocks under your feet formed in a warm sea, were buried, lifted, scraped bare by ice, and have been quietly dissolving along their cracks ever since. You are standing on a process that is still running, at a pace of roughly a millimetre a century.
Photo: marybettiniblank / Pixabay